class: center, middle, inverse # The Define Stage ### J. Hathaway ??? Notes for the _first_ slide! --- class: left, middle # Design Thinking Process > Design thinking seeks to identify needs rather than solve problems. [ref](https://medium.com/startup-grind/build-customer-empathy-by-listening-to-their-stories-38b5df9337aa) 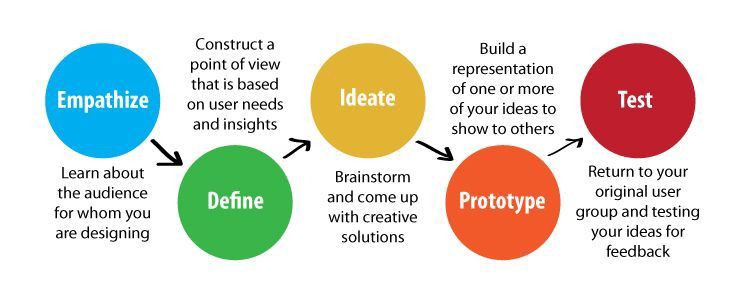 --- class: left, middle # Analysis Vs. Synthesis > If you don’t pay enough attention to defining your problem, you will work like a person stumbling in the dark. > [Interaction Design Foundation](https://www.interaction-design.org/literature/article/stage-2-in-the-design-thinking-process-define-the-problem-and-interpret-the-results) .left-column[ </br> __Analysis:__ is about breaking down complex concepts and problems into smaller, easier-to-understand constituents. We do this in the _Empathise stage_ when we observe and document details that relate to our users.] .right-column[ __Synthesis:__ involves creatively piecing the puzzle together to form purpose. The _Define stage_ is synthesis when we organize, interpret, and make sense of our gathered data to create a _problem statement_.] --- class: left, middle # The boundaries of a good problem statement _A good problem statement should thus have the following traits:_ - **Human-centred.** The problem statement should be about the people the team is trying to help, rather than focusing on technology, monetary returns, or product specifications. - **Broad enough for creative freedom.** The problem statement should not focus too narrowly on a specific method for implementing the solution. - **Narrow enough to make it manageable.** A problem statement such as “Improve the human condition” is too broad. Problem statements should have sufficient constraints to make the project manageable. - **Forward-looking:** A good problem statement is always forward-looking. It contains within it seeds for possibilities. - **Verb driven, action-oriented**: begin the problem statement with a verb, such as “Create”, “Define”, or “Adapt”, to make the problem more action-oriented ([source](https://www.interaction-design.org/literature/article/stage-2-in-the-design-thinking-process-define-the-problem-and-interpret-the-results)). --- class: left, middle # Building our collective stories (Activity 1: 30-60 minutes) ## Share our inspiring stories with our teammates so that they become part of our collective consciousness 1. Use the wall to capture all the team’s Post-it notes and ideas from the story in one place. 2. Tell the most compelling stories from the field to your teammates. Try to be both specific (talking about what actually happened) and descriptive (using physical senses to give texture to the description). Report on who, what, when, where, why, and how. And then invite each of your teammates to share their own inspiring stories. 3. As you listen to your teammates’ stories, write down notes and observations on Post-its. Use concise and complete sentences that everyone on your team can easily understand. Capture quotes, the person’s life history, household details, income, aspirations, barriers, and other observations. 4. Write large enough so that everyone can read your notes. Then put all the Post-its up on the wall, organizing them into separate categories for each person that your team interviewed and each place that your team visited. 5. You’ll have many personas lined up on the wall with hundreds of Post-it notes at the end of story sharing. Consider this shared information as a group and begin to imagine opportunities and solutions. [source](https://www.designkit.org/methods/13) --- class: left, middle # Identifying common themes (Activity 2: 20-40 minutes) 1. Gather your team around the Post-its. Move the most compelling, common, and inspiring quotes, stories, or ideas to a new board and sort them into categories. 2. Look for patterns and relationships between your categories and move the Post-its around as you continue grouping. The goal is to identify key themes and then translate them into opportunities for design. 3. Arrange and rearrange the Post-its, discuss, debate, and talk through what’s emerging. Don’t stop until everyone is satisfied that the clusters represent rich design opportunities. 4. Identifying these Themes will help you [Create Frameworks](http://www.designkit.org/methods/14) and write [Design Principles](http://www.designkit.org/methods/27). [source](https://www.designkit.org/methods/find-themes) --- class: left, middle, inverse, font30 # Zone of Optimal Confusion > It turns out that confusion, like many uncomfortable things in life, is vital for learning. According to research, confusion has the potential to motivate, lead to deep learning, and trigger problem solving. A study led by Sidney D’Mello found that when were trying to work through our confusion, we need to stop and think, engage in careful deliberation, develop a solution, and revise how we approach the next problem. > The same way you feel a muscle ‘burn’ when it’s being strengthened, the brain needs to feel some discomfort when its learning. Your mind might hurt for a while-but that’s a good thing. Comfortable learning environments rarely lead to deep learning. > > [Brene Brown, Atlas of the Heart](https://educate.datathink.io/posts/desirable-difficulty/) --- class: left, middle # Insight Statements (Define) (Activity 3: 20-40 minutes) 1. Take the themes you identified in the [Find Themes](https://www.designkit.org/methods/find-themes) activity and put them up on a wall or board. 2. Take one of the themes and rephrase it as a short statement. You’re not looking for a solution here, merely transforming a theme into what feels like a core insight of your research. Use the [**Insights Checklist worksheet**](https://design-kit-production.s3-us-west-1.amazonaws.com/Design+Kit+Method+Worksheets/DesignKit_Insights+Checklist+Worksheet.pdf) to help build a strong insight statement. 3. Once you’ve done this for all the themes, it’s time to prioritize your insights. Look back at your original [Design Challenge](https://www.designkit.org/methods/frame-your-design-challenge) and the key outcome goal(s) defined, as well as the important ecosystem shifts and constraints that you captured. Sift through your insight statements and discard any that don’t directly relate to your challenge. Reflect on whether you have any gaps and revisit your themes if needed. You should end up with 3 to 5 insight statements. 4. Take a final pass at refining your insights, using your checklist again. Make sure that they convey the sense of a new perspective or possibility. Consider inviting someone not part of your team to read your insight statements and see how they resonate. 5. Your insights will play an essential role in shaping your prototypes and the rest of your design process. From here, you’ll use them to frame [How Might We](https://www.designkit.org/methods/how-might-we) questions, and you’ll come back to them again when you are [Determining What To Prototype](https://www.designkit.org/methods/determine-what-to-prototype). [source](https://www.designkit.org/methods/create-insight-statements) --- class: left, middle, inverse # Define our problem (POV) (Activity 4: 20-40 minutes) .left-column[ 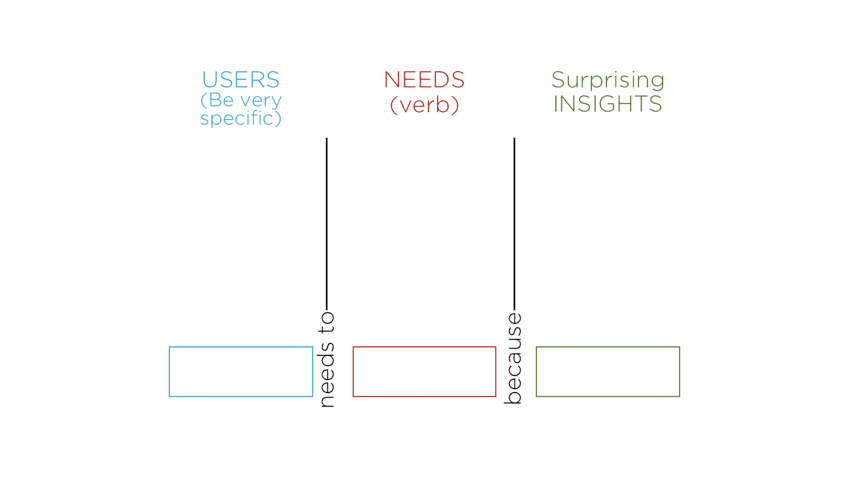 ] .right-column[ 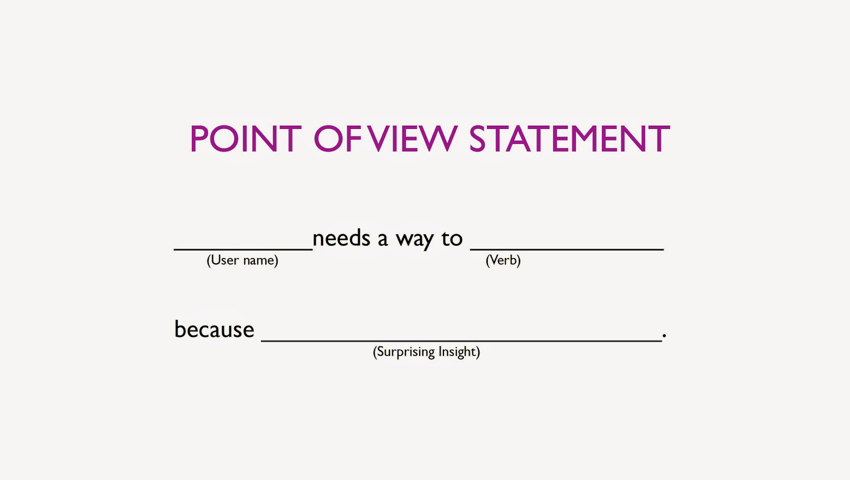 ]